Showing posts with label DIY. Show all posts

LaLaLa Love Collection - Affordable DIY Printable Wedding Invitations

We're people pleasers.  So when Brides began asking us for an affordable line of invitations without sacrificing quality - we listened!  We know our Signature Collections are gorgeous and fun - and oh-so- customizable. But some of you are just so darn crafty that you want to print & embellish yourself!
So we sat down with our latte's and had a major meeting about what would be our solution for all you DIY Brides and Brides-On-A-Budget out there.  With that the La La La Love Collection was born.

The La La La Love Collection is a line of fully, professionally designed invitations that are available as a Digital File OR you can choose to have us print them for you! Use any of our Signature ink colors to create your swoon worthy invitations and make them your own.  One of our designers will work with you to professionally typeset your design. Why didn't we go automated? Because we want your stationery to look great! Online template designs limit graphics, fonts and aren't able to work with your wording - instead you are forced to pick your wording based on the design. We didn't feel that was right! Your invitations, regardless of budget, should look as amazing as possible!

Without further ado... checkout just a few of our new designs for from the La La La Collection. (Oh and did we mention that we are also offering Save the Dates, Thank You cards, Birth Announcements, Birthday invitations, Bridal shower invitations and more? Yeah. We're that cool!)

"Ana" Las Vegas Playing Card Invitation
"Fran" Chalkboard Flourish Wedding Invitation
"Grace" Shabby Chic Bridal Shower Invitation

"Isabelle" Baroque Flourish Wedding Invitation

"Katie" Beach Palm Tree Invitation

"Nellie" Modern Fair Save The Date

"Noah" Little Sailor Birth Announcement

"Olivia" Mason Jar Wedding Invitation

These are just a few of the newest designs! Take a peek at our La La La Love Collection on our website for more great designs... and, of course, more will be added soon! xoxo.

Eggs-ellent!!! Happy Easter!

Spring hasn't sprung just yet (in fact a snow storm is hitting the midwest right now!) BUT lately I have seen gorgeous colored Easter eggs and some Easter foodies and thought I'd share!!!


Who wouldn't want gold foiled eggs or gorgeous gradient eggs in your favorite color! (Of course, it's pink for me!)

via SheKnows

via Sugar and Charm
And for the kiddos (or kiddos-at-heart)...

via Buttercream Blondie
And last... but certainly not least... For the adults (with the leftover Peeps!)

via Feast of Fun
Happy Easter Week!!!
xoxo,
Tara

Launching Soon! Celebrating Spring DGD style!

Okay - It's not spring yet... but we wish it was - so we are letting some thing go a bit earlier than planned.
You may notice a few changes over the next few days. Fear not lovelies! We are getting ready to launch some of our fun new products along with a new look, new features and a great series of posts that you will LOVE checking out!
We can't wait to hear your feedback and look forward to seeing you on the other side!
xoxo,
Tara

Glitter Mason Jar


Mason jars are not new, but they have made a big come back and we are jumping on board! The best way to display things in the studio?  ADD GLITTER! I found these glitter mason jars on Pinterest and HAD to try them!

Here is my original inspiration:

Fresh Affairs


The Knotty Bride

And here is how I made it happen...
Materials: Super Easy! I had everything laying around. Modge Podge, foam brush, glitter, mason jar.


Step one: I took the mason jar (after cleaning and drying thoroughly) and covered it with a layer of modge podge.  This was the most difficult part because you want to make sure that the modge podge is evenly coated or else you will end up with clumps of glitter.


Step two: Start pouring glitter over the jar. I grabbed a small box to glitter in so that I didn't have a huge mess to clean up!

Step three: Once you glitter the whole jar, let it sit for at least 30 minutes to dry. Once dried, use a soft paint brush or something similar to wipe off access glitter.


Finally!!! A gorgeous, glittery jar that you can use for displays and centerpieces!!!  I love it! Glitter makes me smile!

This whole project took about 30 minutes (not including drying time).  It was fun to do and very easy!  If you try this... let us know! We want to see the results!

xoxo,
Tara

Pinned It! Did It!

Just like other amazing crafters, we are a bit addicted to Pinterest.  There are so many great ideas out there that we would never know about without this wonderful site! Christine and I got to talking one day and decided that we spend so much time pinning we never actually DO the projects we pin! So we have decided to start a new series called "Pinned It! Did It!".

A couple of rules for our Pinned It! Did It! series...
1) We will always link back to the original blog post and/or inspiration.  As creative as we like to think we are... we want to give credit where credit is due!

2) Our hope is to show you amazing, successful projects... but sometimes projects go bad. We vow to show you the outcome, good or bad, and we will try to figure out where we went wrong!

We are really excited to show you what projects we have chosen to try!  In the meantime, you can follow us both on Pinterest to see what some of our inspiration is!

Follow Tara here.

Follow Christine here.

Do you have a Pinned It! Did It! project that you tried? Leave a link to your project in the comments section - We'd love to see it!

xoxo,
Tara

Custom Holiday Cards


We are currently working on our Holiday Collection. If you are interested in purchasing custom holiday cards, please feel free to contact us! We are also offering our designs as printables for all of you crafty, DIY types out there! Our printable holiday cards are $25.00!

Contact us here for more information!
xoxo,
Tara

New Wedding Collection - Diana for Library or Book Theme Wedding

My newest collection Diana is a fun twist on a library/book theme.  With this collection, you let your guests know that you refuse to stay quiet in the library!  Along with this theme, I have a few DIY-Bride-On-A-Budget ideas!  But first... my collection!!!!


The Diana Collection is an eclectic mix of corals, mint greens, oranges and yellows. The colors are pleasing to the eye yet also a unique combination. Perfect for a library or book themed wedding but equally as fun for a summer wedding with bright colors. Diana has it all - a modern twist to a traditional idea! As always colors are customizable for the Diana collection.

Interested in more ideas for a library themed wedding?

For an easy (and cheap) centerpiece idea - Buy decorative hardback books.  You can buy these at garage sale, thrift stores, used book stores... or borrow a bunch from the library! Or, go back to your high school days when you had to cover your books! Purchase pretty, decorative scrapbook paper, contact paper, wallpaper, etc. and cover each book with your theme colors!  Sprinkle some flower petals - viola! You have an eye pleasing centerpiece!

Instead of numbering your tables - name them after your favorite books! So instead of sitting at table 2, Aunt Millie will be sitting at the Pride & Prejudice table.

Need others ideas for a library/book theme wedding? Contact me and I will be happy to lend a book ... errrrr... hand!

xoxo,
Tara

Need Inspiration? Enter - The Blushing Bride!

Meet Shardi.  Is she not the cutest little thing you've ever seen? (And her fiance is adorable too!) I love it when 2 adorable people get engaged!!! Okay... got sidetracked ... that's not why I want you to meet her.  She has the greatest blog and I wish I was still planning my wedding because I could have definately used her help.

The Blushing Bride blog is a great source for wedding inspiration.  Have a specific color combo or theme in mind?  Contact Shardi and she will put together a board for you! She puts together the most beautiful boards.  They absolutely make me drool!

Here are just a few of my favorites: (Click picture to get more information)

Blue with Black and White Stripes

Geek Chic

Movie Theme


Seriously?! *Shaking Head* I wonder if my husband would want to get divorced and remarried to me again.  I want to plan another wedding!  So Thank You Shardi from The Blushing Bride - for creating, inspiring bride-to-be's and envoking jealousy in all of us newlyweds out there!

xoxo,
Tara

Handmade Artist - Two Girlz Stuff

Everyone has a different story as to how they started crafting ... whatever your craft is.  Well, ladies and gentlemen I remember being in grade school and spending a lot of my parents money on school supplies.  I had to have the best of the best.  I had SO much stuff that my younger brother didn't have to buy any school supplies all through school... including college!  I had a love of paper, pens, pencils, folders, organization for as long as I can remember.

When Mr. K and I started dating seriously and I met his family I was introduced to the coolest thing I had ever seen... SCRAPBOOKING! It was actually a hobby that I could get away with buying lots of papers, stickers, markers, organizing things! I was hooked! The Queen of Scrapbook? Mr. K's cousin Aja.

Well, needless to say she's super talented.  I love checking out her blog for her cute ideas... check out her elf, Benson here.  Too. Cute.

On top of it all she is also an amazing photographer! She did our engagement photos that I showed in a previous post. (And yes... she's available for hire!)

But all that aside... *sorry got a little sidetracked* She makes the most amazing labels that are perfect for scrapbooking/cardmaking/journaling.  She recently just reopened her store after closing it down last year so that she could spend more time with her family... Did I mention her kids are A-D-O-R-A-B-L-E? Anyway - she had lots and lots of requests to reopen.  Her labels are practically famous!!!!


I bought some from her before her shop closed down and fell in love with them.  They are amazing quality and she cuts them by hand! I swear I thought she had some amazing-super-crazy-mass cutter! *Sigh* Just when I think I'm getting good... she goes and impresses the crap out of me!

If you are dying to try these labels... and you know you are... check out her Etsy store.

So cheers to you my-super-crazy-creative-cousin-in-law! You have amazed me once again!

FIND AJA:
Blog: www.twogirlzstuff.blogspot.com
Shop: http://www.etsy.com/shop/twogirlzstuff

xoxo,
Tara

Handmade Artist - Cameron Homemade

Sometimes, while searching the internet, I come across the most fabulous, wonderful people, blogs and shops!  Recently, I met Cameron from Cameron Homemade.  She has some of the cutest DIY projects and tutorials.  She also has an adorable shop where you can purchase various sewing patterns and in case your not the crafty type - decor and accessories.

Here are just a few things you can find at Cameron Homemade!


Super cute right?  And if you are in the market for a amazingly fun tote bag or purse (bridesmaid gift anyone?) - then you have to check out her bags!

And then as a bonus, Cameron just posted THIS!!!!  She is hosting a giveaway where you win this adorable pennant art!
****RUNNING TO GO CHECK OUT HER SITE AGAIN**** See you all later!


Where Can You Find Cameron Homemade?:
Giveaway
Cameron's Blog
Cameron's Facebook
Cameron's Shop

xoxo,
Tara


Updated Photos of My Studio

A lot of you have seen my original post "The Grand Reveal". After going back, I couldn't help but notice how dark the photos were and that since I had such a great camera now - I thought I should "re-do" this post. I am also going to have a follow up post(s) that shows more a more detailed view of some of my studio. (I just think studio sounds so much more professional, don't you?" So enjoy!


If you missed the original before and after photos, you can view it here.

Details of my room: Click Here!

DIY Dog Bed and Nook for My Faithful Friend!


Meet Porthos.


Porthos is a Cavalier King Charles Spaniel and is my best friend. We craft, snuggle and hang out together. Porthos is by far the best craft buddy I've ever had. He likes everything I do... and most of the time agrees with everything I say.

However, when it came time for me to re-do my studio - there was a bit of miscommunication. You see for the past 5 years I have had a couch with a special pillow that he would sit on while I got crafty.

When rearranging my room, I removed the couch out without thinking. And for the past couple of weeks my poor little buddy has had to lay on his pillow on the floor! *GASP* I could tell that he was pretty unhappy with this. He made sure to let me know... lots of sighs and little whimpers were happening. After all... how was he supposed to supervise from the floor?!

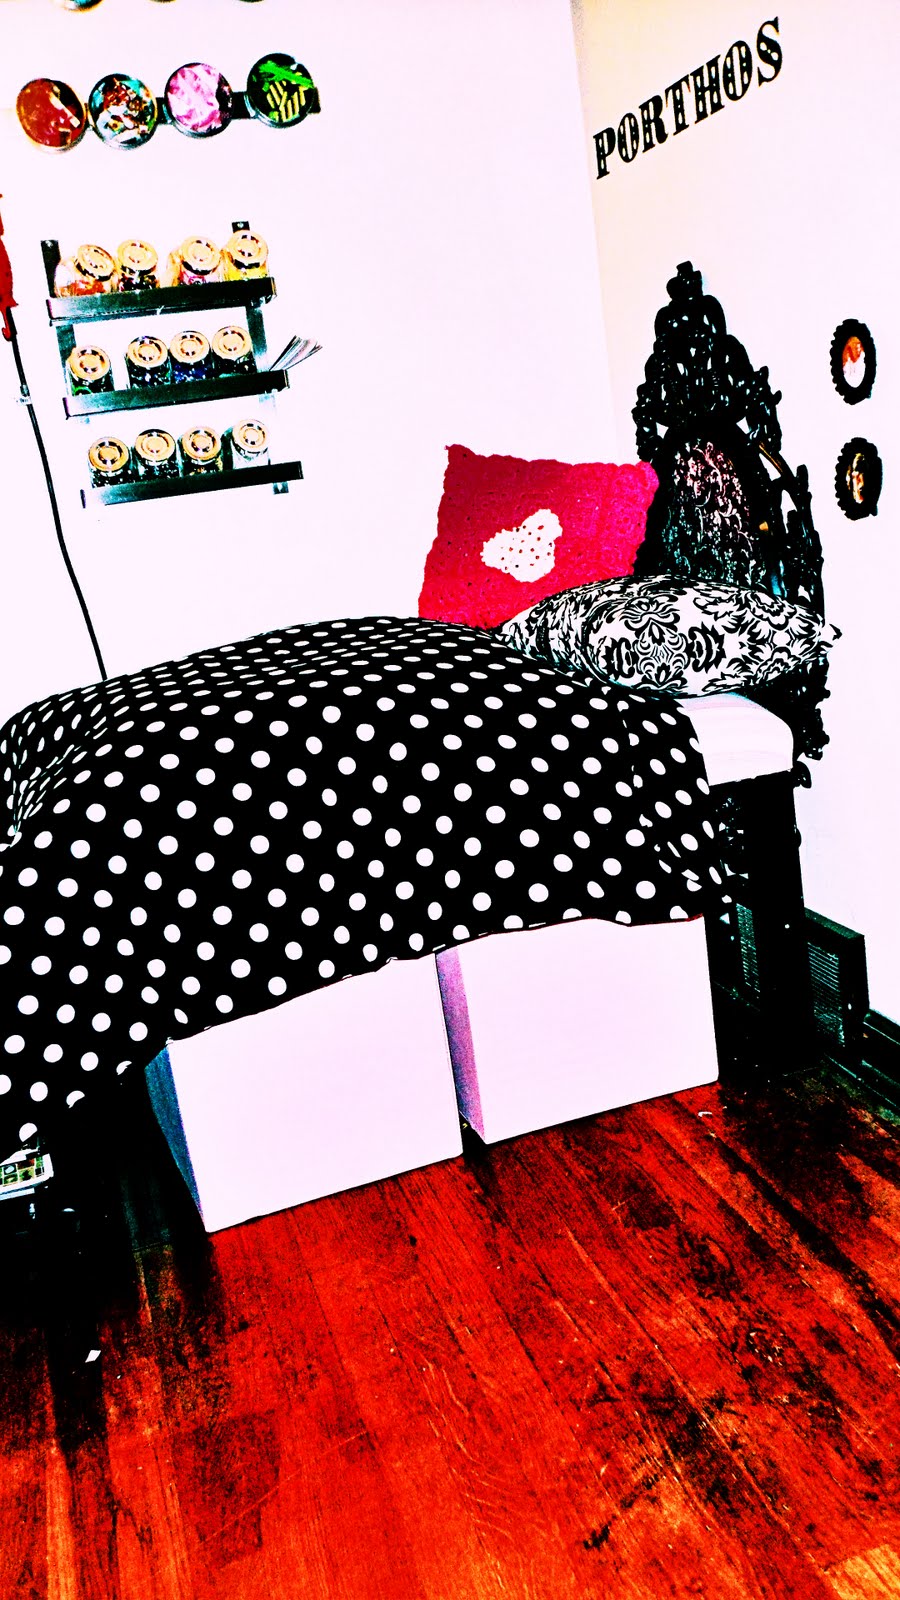
So I decided to make it up to him by creating his own little special corner in my craft room. He has a full bed complete with a cushey mattress, ornate headboard, handmade-by-me comforter and plush pillows. To top it all of pictures of his favorite friends and his name on the wall above it all! He loves it and can't wait to do some serious work each day.


No I do not sew... but yes - I made the comforter (and I am quite proud too!)


Underneath the bed is pink fabric storage boxes from Ikea. Only $4.99 each!


Please excuse the creative filters. I am playing around with Corel PhotoShop.


Doesn't he look like a little Prince sitting on his throne?


The pink pillow was hand crochet by my mother-in-law. And the white w/ black damask sewn by me!
You can see a tad bit of the mattress which is a pink and white striped fabric. Underneath is 2" foam and lots of polyfill.


No bedside would be complete without photos of your best friends! Mr. K and I are in the first one and our Newfoundland, Odin is in the bottom one. Porthos and I love Odin very much but because of his size, fur and slobber - he does not get to visit the studio very often.


I'm pretty sure Porthos likes looking at pictures as much as I do!


Overall, Porthos is thrilled to have his own little nook. Underneath the bed he has his own little storage container with some stuffed animals and chewies... you know ... in case he needs some inspiration during the crafting process!


Now comes the impressive part! Where did this little bed come from?! An old cheap-o coffee table from Ikea
Shhhh... Porthos doesn't know that. He thinks I went out to the Luxury Upscale Doggy Store and bought everything. Instead, I had this little table down in the basement and upcycled it!


What do you think? Do you have a special crafting buddy that you work with?


Linked To:


The Girl Creative