DIY Dog Bed and Nook for My Faithful Friend!


Meet Porthos.


Porthos is a Cavalier King Charles Spaniel and is my best friend. We craft, snuggle and hang out together. Porthos is by far the best craft buddy I've ever had. He likes everything I do... and most of the time agrees with everything I say.

However, when it came time for me to re-do my studio - there was a bit of miscommunication. You see for the past 5 years I have had a couch with a special pillow that he would sit on while I got crafty.

When rearranging my room, I removed the couch out without thinking. And for the past couple of weeks my poor little buddy has had to lay on his pillow on the floor! *GASP* I could tell that he was pretty unhappy with this. He made sure to let me know... lots of sighs and little whimpers were happening. After all... how was he supposed to supervise from the floor?!

So I decided to make it up to him by creating his own little special corner in my craft room. He has a full bed complete with a cushey mattress, ornate headboard, handmade-by-me comforter and plush pillows. To top it all of pictures of his favorite friends and his name on the wall above it all! He loves it and can't wait to do some serious work each day.


No I do not sew... but yes - I made the comforter (and I am quite proud too!)


Underneath the bed is pink fabric storage boxes from Ikea. Only $4.99 each!


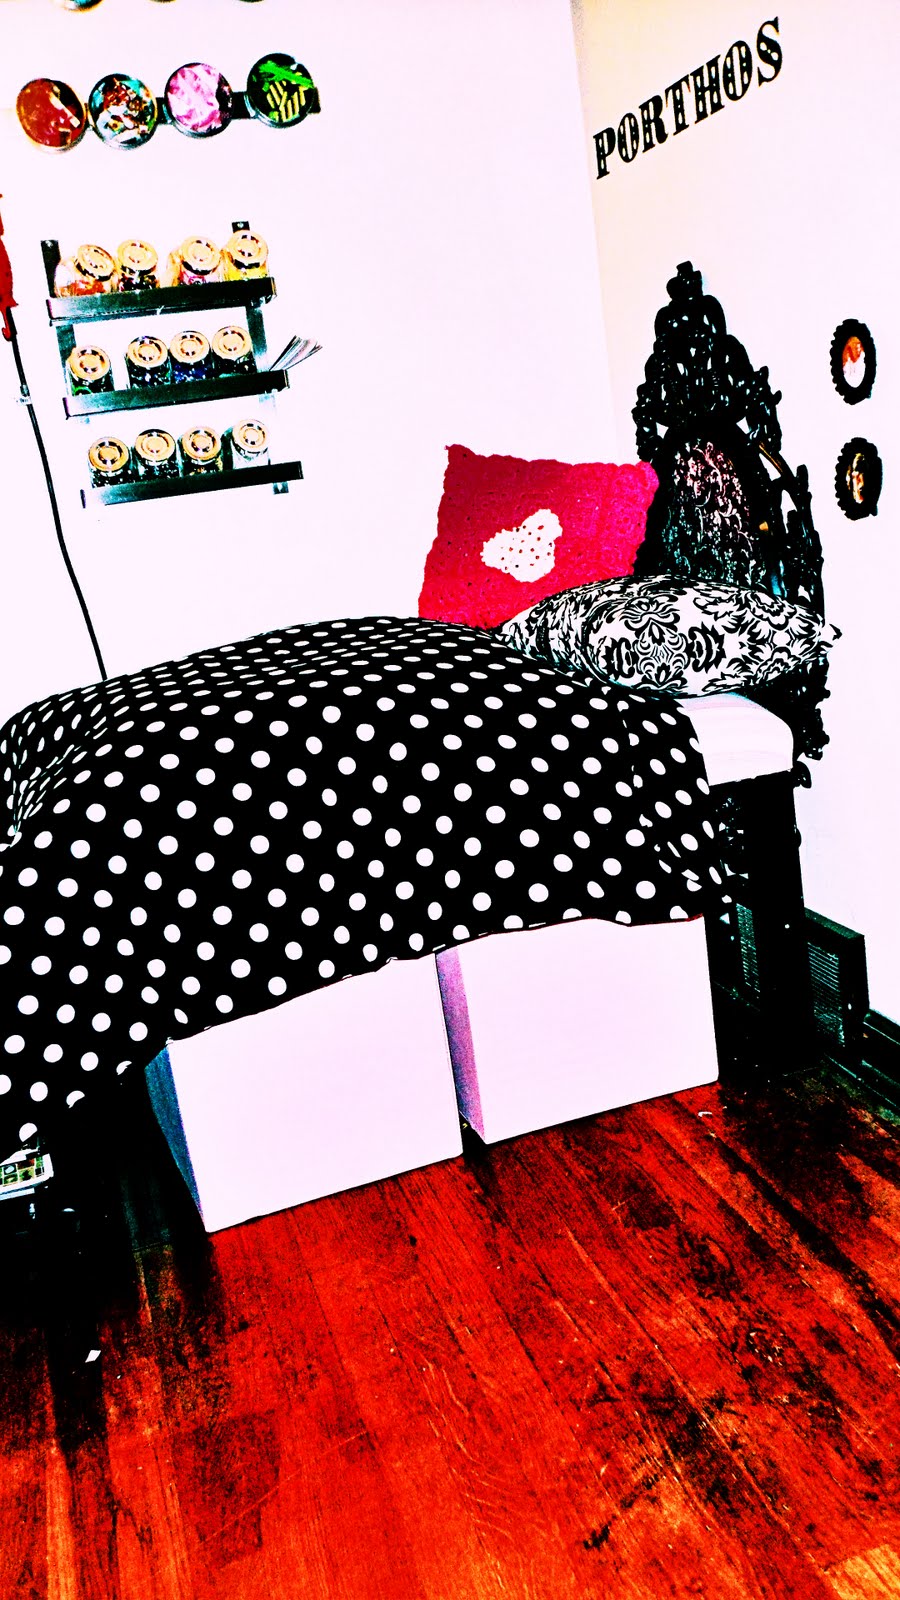
Please excuse the creative filters. I am playing around with Corel PhotoShop.


Doesn't he look like a little Prince sitting on his throne?


The pink pillow was hand crochet by my mother-in-law. And the white w/ black damask sewn by me!
You can see a tad bit of the mattress which is a pink and white striped fabric. Underneath is 2" foam and lots of polyfill.


No bedside would be complete without photos of your best friends! Mr. K and I are in the first one and our Newfoundland, Odin is in the bottom one. Porthos and I love Odin very much but because of his size, fur and slobber - he does not get to visit the studio very often.


I'm pretty sure Porthos likes looking at pictures as much as I do!


Overall, Porthos is thrilled to have his own little nook. Underneath the bed he has his own little storage container with some stuffed animals and chewies... you know ... in case he needs some inspiration during the crafting process!


Now comes the impressive part! Where did this little bed come from?! An old cheap-o coffee table from Ikea
Shhhh... Porthos doesn't know that. He thinks I went out to the Luxury Upscale Doggy Store and bought everything. Instead, I had this little table down in the basement and upcycled it!


What do you think? Do you have a special crafting buddy that you work with?


Linked To:


The Girl Creative

Wedding Shadow Box

I am trying so hard to get rid of all of the "extras" that have accumlated since our wedding. I am so afraid to throw stuff away because I keep thinking "what if I want to scrapbook/display/reuse that in future?" I decided that another way for me keep some of the momentos from our wedding was to make a shadow box to hang up in my studio. (Doesn't "studio" sound so much more official than "craft room"? I think that's what I will call it from now on!) Anyway, I put this together and I think it all turned out SO pretty!
This flower with the rhinestone brooch in the middle was from our gift box. It was so pretty!


I got a little bubble happy and had tons of leftover bubbles. So I threw one in there... compete with the tag.


Also included was an invitation and our monogram cake topper. Lots of shine and sparkle in this little box!


Overall, it was an easy but fun project. I loved making it and found the perfect place to hang it up. How did you go through your wedding stuff and decide what to keep?


XOXO,

Tara

My First Social!

So I have been dying to give these socials, linky parties, etc. a try! I finally did one... and let me tell you - I wish I would I would have done these sooner! You can find so much inspiration from others!
How to participate:
1. Follow your hosts (The Kurtz Corner & The Sasse Life) via Google Friend Connect.
2. Follow the featured blog (Southern Lovely) via Google Friend Connect.
3. Link up your blog's home page -- not a specific link or you will be deleted!
4. Visit at least 2 other blogs and make some friends!
5. Let your friends know by posting this button. The more, the merrier!


The Pinterest Movement

I recently found a site that I fell in love with! I mean it is amazing! It is a great way to explore eye candy without leaving a site. But be careful... it's easy to lose track of time. I thought I would take a moment to really explain what Pinterest was. It seems like so many people are already utilizing the benefits of this wonderful site but others have the question: "What is Pinterest?"

Pinterest is a "virtual inspiration board". Yeah - that meant nothing to me either. So let me break it down a bit further.

1) It's free. It costs you nothing. You can sign up and become a "member" OR you can browse for free.

2) If you love crafts, home decor, wedding, cooking, fitness, architecture, history, travel, photography, cars, sports, technology... just to name a few - you can pick one of these that interest you and BOOM! You have access to all sorts of photos, articles, blogs, etc. that "members" have "pinned" for inspiration.

3) If you choose to become a member you can start pinning your own inspirations! After signing up you save the "Pin It" bar to your favorites. As you are searching the web... on any website - you just click the "Pin It" bar on your favorites bar and WAHLA! You have something pinned on your own board.

4) Another great option is to follow friends, family and people with similar interests to see what they pin. It is linked to facebook and twitter so all of your friends will be found automatically for you. (But if you don't like Aunt Milly's cat decor you don't have to follow her pins.)

Take a moment to check out Pinterest ... you won't regret it! And come back by and tell me what you think! :)

DIY Christmas Ornament - Leftover Invitations

So - I am going through wedding withdrawal. I can't help but feel oddly connected to all of those bits and pieces that are left from my wedding. Extra flowers, candles, cake topper, sashes, etc. Over the past year, I meticulously picked each detail and in a flash it was all over. One of the hardest things for me to get rid of was all of those leftover invitations. Yeah, I kept a couple for scrapbooking but I just couldn't bring myself to throw all of the rest away! So set out on a mission to find an easy (inexpensive) way to use some... throwing them in the trash is just way to hard!!!!!
I happened across Jen's blog: Simcoe Street and found her super easy DIY Ornament tutorial and immediately had to try it out! It was so easy that I made 4 of them in an hour. I plan on keeping one and the other 3 are gifts for our parents.


Now I feel *little * less bad about throwing away about 20 unused invitations! It will be a treasured ornament for many Christmases to come!

Wine Tour 2011

This weekend I attended a Wine Tour in Erie, PA. The Lake Erie Wine Trail is so much fun. I have been there once before but did not know that there were so many wineries in one area! There are over 20 wineries going through Erie, PA into New York.
My mother, grandmother, aunt and best friend all traveled to my house and then we were going to tour the wineries. Come to find out... the Harvest Wine Festival was happening so we bought tickets.
I love putting together little momentos of our trips so I made these books to go with our tour.
I printed out the front cover matte and stamped grape vines on before attaching to the hard cover.


Inside conttained a pocket that I made and stamped "my wine". Inside the pocket I added stickers that I made (each with a different color and last name initial) so that when we bought a bottle of wine, we could label it with our sticker so we knew which ones were ours.


The stickers were made using my cricut and adhesive sticker cardstock.


The pages were put in by using my binding maching. I had a list of the wineries that were on the wine trail with the food/wine they were serving. Also inside were "wine tasting notes" so that we could remember where we bought each bottle of wine and how it tasted. It was fun making these and the girls LOVED them! We had a blast at the wineries and then went to a casino that we passed on our way there. It was so much fun and I am glad I got to spend quality time with family!

Make Up Gift Bags

I love putting together gifts for people! Lucky for me, I am involved in a lot of things that allow me to come up with cutesy goodie bags often. One of the things I do is teach a high school color guard/dance team. For the competition season, they needed show make up. I am against sharing makeup... too many horror stories that include infections and stuff. Plus what girl doesn't want her own little goodie bag to take to competitions?

Each bag contained: makeup brushes, eyeliner, eyeshadow, cosmetic glitter, lipstick and bath and body works lotion. I asked the girls to provide their own foundation (and blush if they wanted it). It's just too hard to pick out foundation for others... I have a hard enough time with picking out my own!


I was lucky enough to have all of these items in stock in my store. Did I mention that I sell health and beauty items too? Anyway, the only thing I had to purchase was the lotion so for 19 gift bags - I spent a total of $19.00!!!! Not bad for a full gift bag of cosmetics.

Groomsman Gifts

UPDATE: My Groomsman Labels have been receiving a lot of attention on multiple websites... including Pinterest. There for I decided to put them in my store for those of you who are interested in purchasing custom labels for your own gifts. I can customize these with different colors and wording according to what you need!

I have a lot to say today! :) On a wedding related note - I wanted to share a Groomsman Gift I put together. I wanted to surprise the guys with a "shot of love" the before the ceremony. I had one of my bridesmaids take these down to the guys' hotel room before we left. It was a great way to let them know that "yes" this was my special day that meant a lot to me but that I didn't plan on taking the day too seriously! It was all about fun! I think it had the effect I was going for... the guys loved them!

I thought my wedding colors were a little too girly so I did a different (but complementing) color combo: ivory, gray and mint green. The tag looks like a vintage movie ticket.


I think these would also make great "party favors" as well. I am thinking about doing something similar to this for a Big New Year's party we are hosting these year. Of course, I will be doing a new design - so stay tuned for that in a few month! :)

Halloween Birthday Surprise

After we got back from our honeymoon - I needed to do something crafty and creative. Lucky for me, my new husbands Birthday was only a couple days after we got back. I decided that I needed to do something special for him (and fun for me) so I planned a little Happy Birthday Halloween Themed Dinner for the 2 of us. I had a blast putting it together. But I was so busy putting it together I didn't get many great pictures.

I made cupcakes for dessert. Chocolate with chocolate icing. Added a few plastic spiders for some fun and put them on a pretty fall tray. Wala!


Please ignore all of the extra stuff! This was during set up!!!
The black candles have a bit of sparkle to them. I got them at Party City for only $5.00 for all 10 of them. (They came in packs of 2 and were on sale!)
I wish I could remember my original inspiration for my arrangement but I became obsessed with putting together a red and purple arrangement. I couldn't find any real purple flowers so I just bought a dozen roses and then went to Michael's and found a bushell of purple flowers for 70% off! Score! I then bought wet foam (with a 40% off coupon) and put the arrangement together myself.
The green was in the roses I bought. I already had the silver pot that I put the arrangement in.
Of course I had to creep it up a bit so I put some spider webbing over the arrangemet with some plastic spiders. (Both on clearance at Party City). I also added a couple of fake rats. I dimmed the lights and lit the candles right before hubby came home.

I'm not a great cook but I was pretty proud of the delicious dinner I made!!! We had:
- Italian Bread
- Spagetti
- Pesto Sauce
- Marinara Sauce
- Chicken Parmesian (The Parmesian Shake 'n' Bake was SOOOO good!)

I also made a pitcher of Sangria. I used 4 different bottles of wine, Sprite, 1/2 cup of Sugar and frozen berry assortment. It was DELICIOUS! We drank the whole thing! The great thing about Sangria is that you it is pretty fail-proof. Just keep dumping and tasting - eventually you come up with something delicious!

When Hubby came home, I had the lights off, the candles lit, and a cd playing of theme songs from some of the most famous horror movies of all time. It was a wonderful evening! I can't wait for my next surprise dinner!

The "Grand Reveal" - Craft Room

Okay - so I fought myself with this... I finally - after much deliberation - chose function over fashion. I love to look at those perfectly put together craft rooms and offices but then find that I am unable be as productive when I focus on design instead of function. I needed something to be able to get to everything easily. My new craft room set up looks nice and organized... at least I think so!

So as promised, I must first show you the before. As a disclaimer, over the 9 months, I have spend more time working and crafting in other rooms of the house... and mainly used the craft room to just shove stuff I didn't know what to do with. Prior to getting engaged I spent over 40 hours a week in my craft room. Hopefully, I will get back into the routine soon! (My husband would sure appreciate that!)

Without Further Ado... Here is the Before:


Believe it or not, this is actually halfway into the project. I had cleaned a lot of stuff up, taken the couch/futon and coffee table out and put it in the spare room. Also, about half of my stuff is in the hallway as shown in this photo:


As you can see... I had quite the mess on my hands! However, with a lot of sweat and little bit of tears (which I will gladly explain later) - My work space is DONE!!!!

<>


I just happen to LOVE my wedding colors. I took all of my leftover wedding paper and put it all together. I think it is such a pretty, romantic pallette!
Whenever I get stuck and need inspriation, I just grab one of these books or magazines! I find that if I do too much research on the internet... I never get to actually crafting.

These storage boxes are holding adhesives, embellishments, scrap paper... and I actually can't remember what's in the other one! It's probably a junk box! :)


When I was first putting together ideas for my wedding - I found a light pink feather and hung it up for inspiration. I ended up not using any pink feathers but did have lots of ivory feathers and lots of pink... so I think it worked. I also have some magnets that I made hung up and our Save The Date magnets hanging up as well.


Each day, I write out a to do list for myself. Whether it be orders that need filled, chores that need done or shopping lists... this is my notepad to remind me of what I need to get done!


Just one of the drawers that are filled with my painting supplies.


In my old 3 stack tupperware storage - I have all of my stamping stuff. This is a drawer with my inks.


And one of the drawers with stamps.


My paper tray. I actually have 2 of them but I broke one when I was trying to move it around so my husband is going to have to fix the castors on the other one before I can stand it up.


Random drawer with Perfect Pearls, H2O's, and a couple of other cool mediums I like to use when making ATC's, Cards, and other projects.


STICKLES and alcohol inks! I love stickles. LOVE LOVE LOVE them!


Inside one of the embellishment boxes.


All 3 of these are embellishment boxes filled with 3D stickers, chipboard, and other fun tidbits. I could barely get them closed but thankfully they have a magnetic snap.


My packaging center. I go through LOTS of these bubble mailers in a week and need to have them close by to package up finished orders to send out.


So that's a brief review of my craft room. Over all it looks clean and organized and I am excited to get in there and get working. However, over the next week, I have other projects that need done before I can get to my craft room.


Do you have a craft room? Did you choose function over fashion? Or were you able to find a perfect balance for yourself?

UPDATE: I have new, updated photos here.